Guest Room Floating Shelves
- raeandhoney
- Nov 21, 2020
- 3 min read

In the guest room I just finished redoing, there is this little nook that was just asking for some shelving. It is the perfect size, and I have been wanting to make shelves like these for a

while now! Here is the space before any painting was done and before we had new carpet put in.
The first thing I did was measure the space I had. It is about seventy-one inches tall and thirty-nine inches wide. At first I wanted three shelves, but I changed my mind and went with two instead. However, I wanted to make sure I spaced them correctly just in case I ever wanted to add a third. To figure out the spacing, I took seventy divided by four. The actual height is seventy-one, but I figured this would be easier math to work with. I took it divided by four because with three shelves, there will be four spaces. This got me seventeen and a half inches, so I was ready to start building!
Since my space had three walls, I was able to put a support board on three sides of each shelf. I used pine 1x2s for this, and since they won't be seen, I didn't bother staining them. These boards need to be secure, so I used 2" screws and screwed them into a stud. The supports on the side did not have any studs, so I used drywall anchors to help keep them sturdy. This process requires a lot of careful measuring, but I figured out how to make this a little easier:


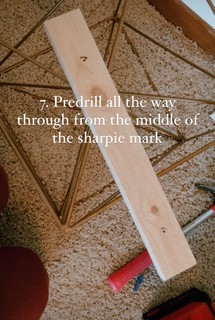


I don't have a good picture of what the support boards looked like, but hopefully you can get the picture after looking at step nine above.
The rest was pretty simple! I had some 1x12s cut for this space; I chose this width of boards because I didn't want the shelves to look too small for the space, but I also didn't want them sticking out too far since they are near the door. These rested on top of my support boards and were then nailed in from the top into the side supports.
The last step in building them was cutting a 1x3 board to the correct size (a little big to make sure they were flush with the walls) and nailing them to both the support boards and

the shelf itself. This makes the shelves look like a nice big chunk of wood without the weight and expense. Even though it seems like these front boards would be the same length, I measure both shelves to make sure since walls are always wonky! These two shelves are about an eighth of an inch different in width. Doesn't seem like much, but that's a pretty big gap when trying to fill it with wood filler.
Which brings me to the next step. The walls along the side and back were a little bowed, so I had some gaps I needed to fill with stainable wood filler. Some gaps were large enough to fill multiple times, while others were good after one quick fill. When filling the gaps along the edges, I taped the walls so the wood filler would look clean and straight when I was finished. Then came lots of sanding, vacuuming, and wiping off the dust to make sure these looked the way I wanted them to when I was finished!


Here is a close up of a gap along the side and what the shelves looked like in the process!

The final step was staining and styling, which was obviously the most fun! Here is the result, finished just in time for the in-laws to come visit!
I hope this was helpful!
Deanna


Comments